On Raspbian, you don't need to install the 8192cu driver manually, as it comes with the distribution
To avoid disconnection issues, you need however to disable power management. This needs to be done in two places. First, this is what I have in /etc/modprobe.d/8192cu.conf:
options 8192cu rtw_power_mgnt=0 rtw_enusbss=0
This alone did not prevent the issue. I also had to add this entry to /etc/network/interfaces:
auto wlan0
allow-hotplug wlan0
iface wlan0 inet dhcp
wpa-conf /etc/wpa_supplicant/wpa_supplicant.conf
wireless-power off
iface default inet dhcp
Somehow, most of the time my Arduino-based EggBot clone outputs one byte of undetermined garbage before saying "Ready". This caused gcode-sender.rb to fail with "invalid byte sequence in UTF-8 (ArgumentError)".
Eventually I found the solution in a post by Wayne Brissette here: https://www.ruby-forum.com/topic/4409620. Basically you need to treat the string as binary instead of utf-8. This small change in the code that waits for the robot to be ready fixed the issue for me:
--- gcode-sender.rb.orig
+++ gcode-sender.rb
@@ -30,7 +30,7 @@
   sp.read_timeout = 0 # Necessary for Windows.
   while line = sp.gets
     print line
-    break if line.match(/^Ready/)
+    break if line.force_encoding("BINARY").match(/^.?Ready/)
   end
   File.foreach(filename) do |line|
     line.chomp!
Recent changes introduced with iOS 10 prevent you from mounting an iPhone on a regular Ubuntu installation.
The PPA by Martin Salbaba used to fix the issue, but it hasn't been updated in a while, and now when I connect my iPhone (running iOS 10.2.1) the pictures are no longer accessible, although the documents are still there.
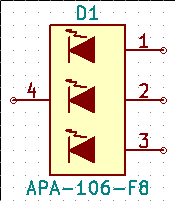
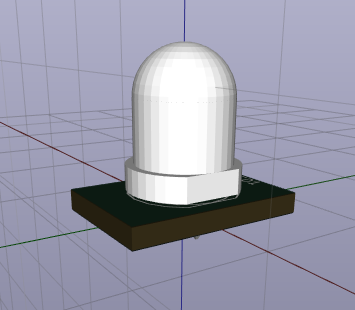
You are free to use/change/distribute it in any way for any purpose. Attribution would be nice but is not mandatory.
The 3D model was made with OpenSCAD based on the instructions from Christopher J. Woodall. (The only difference is that I used meshlab to convert the OpenSCAD STL to binary instead of meshconv.)
Update 2020-12-05: the original post with the instructions is no longer online, but you can still find it here.